Two NUT websites
This version of the page reflects NUT release v2.7.4 with codebase commited 0b4bfddbc at 2016-03-09T14:24:11+01:00
Options, features and capabilities in current development (and future releases) are detailed on the main site and may differ from ones described here.
This chapter describe most of the configuration and use aspects of NUT, including establishing communication with the device and configuring safe shutdowns when the UPS battery runs out of power.
There are many programs and features in this package. You should check out the NUT Overview and other accompanying documentation to see how it all works.
Note
NUT does not currently provide proper graphical configuration tools. However, there is now support for Augeas, which will enable the easier creation of configuration tools. Moreover, nut-scanner(8) is available to discover supported devices (USB, SNMP, Eaton XML/HTTP and IPMI) and NUT servers (using Avahi or the classic connection method).
All configuration files within this package are parsed with a common state machine, which means they all can use a number of extras described here.
First, most of the programs use an uppercase word to declare a configuration directive. This may be something like MONITOR, NOTIFYCMD, or ACCESS. The case does matter here. "monitor" won’t be recognized.
Next, the parser does not care about whitespace between words. If you like to indent things with tabs or spaces, feel free to do it here.
If you need to set a value to something containing spaces, it has to be contained within "quotes" to keep the parser from splitting up the line. That is, you want to use something like this:
SHUTDOWNCMD "/sbin/shutdown -h +0"
Without the quotes, it would only see the first word on the line.
OK, so let’s say you really need to embed that kind of quote within your configuration directive for some reason. You can do that too.
NOTIFYCMD "/bin/notifyme -foo -bar \"hi there\" -baz"
In other words, \ can be used to escape the ".
Finally, for the situation where you need to put the \ character into your
string, you just escape it.
NOTIFYCMD "/bin/notifyme c:\\dos\\style\\path"
The \ can actually be used to escape any character, but you only really
need it for \, ", and # as they have special meanings to the parser.
When using file names with space characters, you may end up having tricky
things since you need to write them inside "" which must be escaped:
NOTIFYCMD "\"c:\\path with space\\notifyme\" \"c:\\path with space\\name\""
# is the comment character. Anything after an unescaped # is ignored.
Something like this…
identity = my#1ups
will actually turn into identity = my, since the # stops the
parsing. If you really need to have a # in your configuration, then
escape it.
identity = my\#1ups
Much better.
The = character should be used with care too. There should be only one
"simple" = character in a line: between the parameter name and its value.
All other = characters should be either escaped or within "quotes".
password = 123=123
is incorrect. You should use:
password = 123\=123
or:
password = "123=123"
You can put a backslash at the end of the line to join it to the next one. This creates one virtual line that is composed of more than one physical line.
Also, if you leave the "" quote container open before a newline, it will
keep scanning until it reaches another one. If you see bizarre behavior
in your configuration files, check for an unintentional instance of
quotes spanning multiple lines.
This chapter describe the base configuration to establish communication with the device.
This will be sufficient for PDU. But for UPS and SCD, you will also need to configure automatic shutdowns for low battery events.
Create one section per UPS in /usr/local/ups/etc/ups.conf
To find out which driver to use, check the Hardware Compatibility List, or data/driver.list.
Once you have picked a driver, create a section for your UPS in ups.conf. You must supply values for "driver" and "port".
Some drivers may require other flags or settings. The "desc" value is optional, but is recommended to provide a better description of what your UPS is supporting.
A typical device without any extra settings looks like this:
[mydevice]
        driver = mydriver
        port = /dev/ttyS1
        desc = "Workstation"
Note
USB drivers (usbhid-ups, bcmxcp_usb, tripplite_usb, blazer_usb and richcomm_usb) are special cases and ignore the port value. You must still set this value, but it does not matter what you set it to; a common and good practice is to set port to auto, but you can put whatever you like. If you only own one UBS UPS, the driver will find it automatically. If you own more than one, refer to the driver’s manual page for more information on matching a specific device.
References: ups.conf(5), nutupsdrv(8), bcmxcp_usb(8), blazer(8), richcomm_usb(8), tripplite_usb(8), usbhid-ups(8)
Start the driver(s) for your hardware:
/usr/local/ups/sbin/upsdrvctl start
Make sure the driver doesn’t report any errors. It should show a
few details about the hardware and then enter the background. You
should get back to the command prompt a few seconds later. For
reference, a successful start of the usbhid-ups driver looks like this:
# /usr/local/ups/sbin/upsdrvctl start
Network UPS Tools - Generic HID driver 0.34 (2.4.1)
USB communication driver 0.31
Using subdriver: MGE HID 1.12
Detected EATON - Ellipse MAX 1100 [ADKK22008]
If the driver doesn’t start cleanly, make sure you have picked the right one for your hardware. You might need to try other drivers by changing the "driver=" value in ups.conf.
Be sure to check the driver’s man page to see if it needs any extra
settings in ups.conf to detect your hardware.
If it says can't bind /var/state/ups/... or similar, then your
state path probably isn’t writable by the driver. Check the
permissions and mode on that directory.
After making changes, try the Ownership and permissions step again.
References: man pages: nutupsdrv(8), upsdrvctl(8)
Configure upsd, which serves data from the drivers to the clients.
First, edit upsd.conf to allow access to your client systems. By default, upsd will only listen to localhost port 3493/tcp. If you want to connect to it from other machines, you must specify each interface you want upsd to listen on for connections, optionally with a port number.
LISTEN 127.0.0.1 3493
LISTEN ::1 3493
Note
Refer to the NUT user manual security chapter for information on how to access and secure upsd clients connections.
Next, create upsd.users. For now, this can be an empty file. You can come back and add more to it later when it’s time to configure upsmon or run one of the management tools.
Do not make either file world-readable, since they both hold access control data and passwords. They just need to be readable by the user you created in the preparation process.
The suggested configuration is to chown it to root, chgrp it to the group you created, then make it readable by the group.
chown root:nut upsd.conf upsd.users
chmod 0640 upsd.conf upsd.users
References: man pages: upsd.conf(5), upsd.users(5), upsd(8)
Start the network data server:
/usr/local/ups/sbin/upsd
Make sure it is able to connect to the driver(s) on your system. A successful run looks like this:
# /usr/local/ups/sbin/upsd
Network UPS Tools upsd 2.4.1
listening on 127.0.0.1 port 3493
listening on ::1 port 3493
Connected to UPS [eaton]: usbhid-ups-eaton
upsd prints dots while it waits for the driver to respond. Your system may print more or less depending on how many drivers you have and how fast they are.
Note
if upsd says that it can’t connect to a UPS or that the data is stale, then your ups.conf is not configured correctly, or you have a driver that isn’t working properly. You must fix this before going on to the next step.
Reference: man page: upsd(8)
Make sure that the UPS is providing good status data.
/usr/local/ups/bin/upsc myupsname@localhost ups.status
You should see just one line in response:
OL
OL means your system is running on line power. If it says something
else (like OB - on battery, or LB - low battery), your driver was
probably misconfigured during the Driver configuration
step. If you reconfigure the driver, use upsdrvctl stop to stop it, then
start it again as shown in the Starting driver(s) step.
Reference: man page: upsc(8)
Look at all of the status data which is being monitored.
/usr/local/ups/bin/upsc myupsname@localhost
What happens now depends on the kind of device and driver you have. In the list, you should see ups.status with the same value you got above. A sample run on a UPS (Eaton Ellipse MAX 1100) looks like this:
battery.charge: 100
battery.charge.low: 20
battery.runtime: 2525
battery.type: PbAc
device.mfr: EATON
device.model: Ellipse MAX 1100
device.serial: ADKK22008
device.type: ups
driver.name: usbhid-ups
driver.parameter.pollfreq: 30
driver.parameter.pollinterval: 2
driver.parameter.port: auto
driver.version: 2.4.1-1988:1990M
driver.version.data: MGE HID 1.12
driver.version.internal: 0.34
input.sensitivity: normal
input.transfer.boost.low: 185
input.transfer.high: 285
input.transfer.low: 165
input.transfer.trim.high: 265
input.voltage.extended: no
outlet.1.desc: PowerShare Outlet 1
outlet.1.id: 2
outlet.1.status: on
outlet.1.switchable: no
outlet.desc: Main Outlet
outlet.id: 1
outlet.switchable: no
output.frequency.nominal: 50
output.voltage: 230.0
output.voltage.nominal: 230
ups.beeper.status: enabled
ups.delay.shutdown: 20
ups.delay.start: 30
ups.firmware: 5102AH
ups.load: 0
ups.mfr: EATON
ups.model: Ellipse MAX 1100
ups.power.nominal: 1100
ups.productid: ffff
ups.serial: ADKK22008
ups.status: OL CHRG
ups.timer.shutdown: -1
ups.timer.start: -1
ups.vendorid: 0463
Reference: man page: upsc(8), NUT command and variable naming scheme
The whole point of UPS software is to bring down the OS cleanly when you run out of battery power. Everything else is roughly eye candy.
To make sure your system shuts down properly, you will need to perform some additional configuration and run upsmon. Here are the basics.
When your UPS batteries get low, the operating system needs to be brought down cleanly. Also, the UPS load should be turned off so that all devices that are attached to it are forcibly rebooted.
Here are the steps that occur when a critical power event happens:
- The UPS goes on battery
The UPS reaches low battery (a "critical" UPS), that is to say upsc displays:
ups.status: OB LB
The exact behavior depends on the specific device, and is related to:
- battery.charge and battery.charge.low
- battery.runtime and battery.runtime.low
The upsmon master notices and sets "FSD" - the "forced shutdown" flag to tell all slave systems that it will soon power down the load.
(If you have no slaves, skip to step 6)
upsmon slave systems see "FSD" and:
- generate a NOTIFY_SHUTDOWN event
- wait FINALDELAY seconds - typically 5
- call their SHUTDOWNCMD
- disconnect from upsd
- The upsmon master system waits up to HOSTSYNC seconds (typically 15) for the slaves to disconnect from upsd. If any are connected after this time, upsmon stops waiting and proceeds with the shutdown process.
The upsmon master:
- generates a NOTIFY_SHUTDOWN event
- waits FINALDELAY seconds - typically 5
- creates the POWERDOWNFLAG file - usually /etc/killpower
- calls the SHUTDOWNCMD
- On most systems, init takes over, kills your processes, syncs and unmounts some filesystems, and remounts some read-only.
- init then runs your shutdown script. This checks for the POWERDOWNFLAG, finds it, and tells the UPS driver(s) to power off the load.
- The system loses power.
- Time passes. The power returns, and the UPS switches back on.
- All systems reboot and go back to work.
Create a upsd user for upsmon to use while monitoring this UPS.
Edit upsd.users and create a new section. upsmon will connect to upsd and use this user name (in brackets) and password to authenticate. This example is for a user called "monuser":
[monuser]
        password = mypass
        upsmon master
        # or upsmon slave
References: upsd(8), upsd.users(5)
Reload upsd. Depending on your configuration, you may be able to do this without stopping upsd:
/usr/local/ups/sbin/upsd -c reload
If that doesn’t work (check the syslog), just restart it:
/usr/local/ups/sbin/upsd -c stop
/usr/local/ups/sbin/upsd
Note
if you want to make reloading work later, see the entry in the FAQ about starting upsd as a different user.
Set the POWERDOWNFLAG location for upsmon.
In upsmon.conf, add a POWERDOWNFLAG directive with a filename. upsmon will create this file when the UPS needs to be powered off during a power failure when low battery is reached.
We will test for the presence of this file in a later step.
POWERDOWNFLAG /etc/killpower
References: man pages: upsmon(8), upsmon.conf(5)
The recommended setting is to have it owned by root:nut, then make it readable by the group and not world. This file contains passwords that could be used by an attacker to start a shutdown, so keep it secure.
chown root:nut upsmon.conf
chmod 0640 upsmon.conf
This step has been placed early in the process so you secure this file before adding sensitive data in the next step.
Edit upsmon.conf and create a MONITOR line with the UPS definition (<upsname>@<hostname>), username and password from the NUT user creation step, and the master or slave setting.
If it’s the master (i.e., it’s connected to this UPS directly):
MONITOR myupsname@mybox 1 monuser mypass master
If it’s just monitoring this UPS over the network, and some other system is the master:
MONITOR myupsname@mybox 1 monuser mypass slave
The number "1" here is the power value. This should always be set to 1 unless you have a very special (read: expensive) system with redundant power supplies. In such cases, refer to the User Manual:
References: upsmon(8), upsmon.conf(5)
Still in upsmon.conf, add a directive that tells upsmon how to shut down your system. This example seems to work on most systems:
SHUTDOWNCMD "/sbin/shutdown -h +0"
Notice the presence of "quotes" here to keep it together.
If your system has special needs, you may want to set this to a script which does local shutdown tasks before calling init.
/usr/local/ups/sbin/upsmon
If it complains about something, then check your configuration.
Look for messages in the syslog to indicate success. It should look something like this:
May 29 01:11:27 mybox upsmon[102]: Startup successful
May 29 01:11:28 mybox upsd[100]: Client monuser@192.168.50.1
logged into UPS [myupsname]
Any errors seen here are probably due to an error in the config files of either
upsmon or upsd. You should fix them before continuing.
Note
This step is not need if you installed from packages.
Edit your startup scripts, and add a call to upsmon.
Make sure upsmon starts when your system comes up. Do it after upsdrvctl
and upsd, or it will complain about not being able to contact the server.
You may delete the POWERDOWNFLAG in the startup scripts, but it is not
necessary. upsmon will clear that file for you when it starts.
Note
Init script examples are provide in the scripts directory of the NUT source tree, and in the various packages that exist.
Note
This step is not need if you installed from packages.
Edit your shutdown scripts, and add upsdrvctl shutdown.
You should configure your system to power down the UPS after the filesystems are remounted read-only. Have it look for the presence of the POWERDOWNFLAG (from upsmon.conf(5)), using this as an example:
        if (test -f /etc/killpower)
        then
                echo "Killing the power, bye!"
                /usr/local/ups/bin/upsdrvctl shutdown

                sleep 120

                # uh oh... the UPS power-off failed
                # you probably want to reboot here so you don't get stuck!
                # *** see also the section on power races in the FAQ! ***
        fi
Warning
- Be careful that upsdrvctl command will probably power off your machine. Don’t use it unless your system is ready to be halted by force. If you run RAID, read the RAID warning below!
- Make sure the filesystem(s) containing upsdrvctl, ups.conf and your UPS driver(s) are mounted (possibly in read-only mode) when the system gets to this point. Otherwise it won’t be able to figure out what to do.
UPS equipment varies from manufacturer to manufacturer and even within model lines. You should test the shutdown sequence on your systems before leaving them unattended. A successful sequence is one where the OS halts before the battery runs out, and the system restarts when power returns.
The first step is to see how upsdrvctl will behave without actually turning off power. To do so, use the -t argument:
/usr/local/ups/bin/upsdrvctl -t shutdown
It will display the sequence without actually calling the drivers.
You can finally test a forced shutdown sequence (FSD) using:
/usr/local/ups/sbin/upsmon -c fsd
This will execute a full shutdown sequence, as presented in Shutdown design, starting from the 3rd step.
If everything works correctly, the computer will be forcibly powered off, may remain off for a few seconds to a few minutes (depending on the driver and UPS type), then will power on again.
If your UPS just sits there and never resets the load, you are vulnerable to a power race and should add the "reboot after timeout" hack at the very least.
Also refer to the section on power races in the FAQ.
Support for suspend to RAM and suspend to disk has been available in the Linux kernel for a while now. For obvious reasons, suspending to RAM isn’t particularly useful when the UPS battery is getting low, but suspend to disk may be an interesting concept.
This approach minimizes the amount of disruption which would be caused by an extended outage. The UPS goes on battery, then reaches low battery, and the system takes a snapshot of itself and halts. Then it is turned off and waits for the power to return.
Once the power is back, the system reboots, pulls the snapshot back in, and keeps going from there. If the user happened to be away when it happened, they may return and have no idea that their system actually shut down completely in the middle.
In order for this to work, you need to shutdown NUT (UPS driver, upsd server and upsmon client) in the suspend script and start them again in the resume script. Don’t try to keep them running. The upsd server will latch the FSD state (so it won’t be usable after resuming) and so will the upsmon client. Some drivers may work after resuming, but many don’t and some UPSs will require re-initialization, so it’s best not to keep this running either.
After stopping driver, server and client you’ll have to send the UPS the command to shutdown only if the POWERDOWNFLAG is present. Note that most likely you’ll have to allow for a grace period after sending upsdrvctl shutdown since the system will still have to take a snapshot of itself after that. Not all drivers support this, so before going down this road, make sure that the one you’re using does.
If you run any sort of RAID equipment, make sure your arrays are either halted (if possible) or switched to "read-only" mode. Otherwise you may suffer a long resync once the system comes back up.
The kernel may not ever run its final shutdown procedure, so you must take care of all array shutdowns in userspace before upsdrvctl runs.
If you use software RAID (md) on Linux, get mdadm and try using mdadm --readonly to put your arrays in a safe state. This has to happen after your shutdown scripts have remounted the filesystems.
On hardware RAID or other kernels, you have to do some detective work. It may be necessary to contact the vendor or the author of your driver to find out how to put the array in a state where a power loss won’t leave it "dirty".
Our understanding is that most if not all RAID devices on Linux will be fine unless there are pending writes. Make sure your filesystems are remounted read-only and you should be covered.
The split nature of this UPS monitoring software allows a wide variety of power connections. This chapter will help you identify how things should be configured using some general descriptions.
There are two main elements:
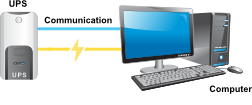
- There’s a UPS attached to a communication (serial, USB or network) port on this system.
- This system depends on a UPS for power.
You can play "mix and match" with those two to arrive at these descriptions for individual hosts:
- A: 1 but not 2
- B: 2 but not 1
- C: 1 and 2
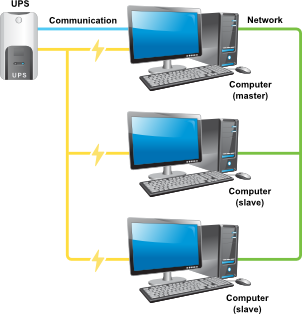
A small to medium sized data room usually has one C and a bunch of Bs. This means that there’s a system (type C) hooked to the UPS which depends on it for power. There are also some other systems in there (type B) which depend on that same UPS for power, but aren’t directly connected to it.
Larger data rooms or those with multiple UPSes may have several "clusters" of the "single C, many Bs" depending on how it’s all wired.
Finally, there’s a special case. Type A systems are connected to a UPS’s serial port, but don’t depend on it for power. This usually happens when a UPS is physically close to a box and can reach the serial port, but the wiring is such that it doesn’t actually feed it.
Once you identify a system’s type, use this list to decide which of the programs need to be run for monitoring:
- A: driver and upsd
- B: upsmon (as slave)
- C: driver, upsd, and upsmon (as master)
To further complicate things, you can have a system that is hooked to multiple UPSes, but only depends on one for power. This particular situation makes it an "A" relative to one UPS, and a "C" relative to the other. The software can handle this - you just have to tell it what to do.
Note
NUT can also serve as a data proxy to increase the number of clients, or share the communication load between several upsd instances.
If you are running large server-class systems that have more than one power feed, see the next section for information on how to handle it properly.
By using multiple MONITOR statements in upsmon.conf, you can configure an environment where a large machine with redundant power monitors multiple separate UPSes.
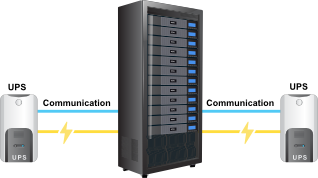
For the examples in this section, we will use a server with four power supplies installed.
Two UPS, Alpha and Beta, are each driving two of the power supplies. This means that either Alpha or Beta can totally shut down and the server will be able to keep running.
The upsmon.conf configuration that reflect this is the following:
MONITOR ups-alpha@myhost 2 monuser mypass master
MONITOR ups-beta@myhost 2 monuser mypass master
MINSUPPLIES 2
With that configuration, upsmon will only shut down when both UPS reaches a critical (on battery + low battery) condition, since Alpha and Beta provide the same power value.
As an added bonus, this means you can move a running server from one UPS to another (for maintenance purpose for example) without bringing it down since the minimum power will be provided at all times.
The MINSUPPLIES line tells upsmon that we need at least 2 power supplies to be receiving power from a good UPS (on line or on battery, just not on battery and low battery).
Note
we could have used a Power Value of 1 for both UPS, and MINSUPPLIES set to 1 too. These values are purely arbitrary, so you are free to use your own rules. Here, we have linked these values to the number of power supplies that each UPS is feeding (2).
If you have multiple UPSes connected to your system, chances are that you need to shut them down in a specific order. The goal is to shut down everything but the one keeping upsmon alive at first, then you do that one last.
To set the order in which your UPSes receive the shutdown commands, define the sdorder value in your ups.conf.
[bigone]
        driver = usbhid-ups
        port = auto
        sdorder = 2
[littleguy]
driver = mge-shut
port = /dev/ttyS0
sdorder = 1[misc]
driver = blazer_ser
port = /dev/ttyS1
sdorder = 0The order runs from 0 to the highest number available. So, for this configuration, the order of shutdowns would be misc, littleguy, and then bigone.
Note
If you have a UPS that shouldn’t be shutdown when running upsdrvctl shutdown, set the sdorder to -1.
There are a lot of ways to handle redundancy and they all come down to how many power supplies, power cords and independent UPS connections you have. A system with a 1:1 cord:supply ratio has more wires stuffed behind it, but it’s much easier to move things around since any given UPS drives a smaller percentage of the overall power.
More information can be found in the NUT user manual, and the various user manual pages.